
EmailTooltester is supported by readers like yourself. We may earn a commission when you purchase through our links. Of course, this won't increase the cost for you.
Are you thinking of migrating from Mailchimp to MailerLite? Good choice! When comparing Mailchimp to MailerLite, it’s pretty clear that MailerLite is a more attractive option for small businesses (especially those on a budget). And it’s not just the lower price tag that makes it more appealing – there are plenty of reasons why this switch could seriously benefit your email marketing efforts.
In this quick-start guide, we’ll show you how MailerLite stacks up against Mailchimp and walk you through each step of the migration process to make your switch as smooth as possible. Let's get started!
Why Migrate from Mailchimp to MailerLite?
Switching platforms might seem like a big decision, but MailerLite offers some clear advantages that make the move worthwhile. Let’s break down what makes it a strong alternative.
Affordability
First up, let's look at price tags! As you’ve probably heard, MailerLite offers a more cost-effective pricing structure, making it a much more affordable option for growing businesses.
For example, MailerLite's higher-tier plans are notably cheaper than Mailchimp's, with a $73/month plan for 10,000 subscribers compared to Mailchimp's $110/month for the same number of subscribers.
The money saved switching from MailChimp to MailerLite will amount to quite a lot in the long run. These significant cost savings will allow businesses to allocate their marketing budget more efficiently, which is particularly beneficial for small to medium-sized companies on a budget.
User-Friendly Interface
Based on our experience, Mailchimp’s interface can be less intuitive, with some features quite hard to find. For example, adding opt-in forms for new sign-ups can be confusing, especially for beginner users.
MailerLite, on the other hand, ensures that all necessary steps for setting up a new campaign are easy to follow, making it accessible to users of all skill levels. Its user-friendly design includes clear, streamlined, and straightforward instructions, which help users quickly understand and utilize the platform's capabilities.
This simplicity reduces the learning curve for users and contributes to a more pleasant and efficient user experience. Additionally, MailerLite's emphasis on ease-of-use means that even complex tasks can be completed with minimal effort, allowing users to focus more on crafting effective campaigns instead of getting bogged down by the platform’s features.
Flexible List Management
MailerLite provides more flexible list management, which is a significant advantage over Mailchimp. In Mailchimp, lists are mutually exclusive, meaning contacts cannot be included in different lists without being counted multiple times, leading to higher costs.
Mailchimp overcomplicates contact management with its confusing mix of audiences, segments, tags, and groups, often leaving users struggling to understand their distinct purpose – especially as a beginner user.
Worse still, Mailchimp charges for unsubscribed contacts and duplicate subscribers across lists, meaning that you have to constantly monitor and clean your lists to avoid paying for inactive or duplicate contacts.
MailerLite handles this entire process as you’d expect, ensuring that a subscriber is only counted once, regardless of how many groups or segments they belong to. This prevents unnecessary charges and makes list management more straightforward.
Users can easily organize their contacts without worrying about inflated costs or complex categorization. Keeping things straightforward not only reduces potential confusion but also enhances the overall user experience by providing a clear and efficient way to handle subscribers.

Accessible Automation Features
With MailerLite, automation features are available even on the free plan, letting users create multi-step workflows triggered by campaign actions, custom fields, and segments. Mailchimp, on the other hand, locks automation behind its paid plan, requiring at least an Essentials plan to access even the most basic automation features.
And here’s the worst part: Mailchimp actually lets you build the entire automation only to hit you with the news that you’ll need to upgrade to activate it. Ouch.
Moving From Mailchimp: A Checklist
- Sign up for your MailerLite account and familiarize yourself with the interface.
- Import your list. You won’t be charged until you decide to upgrade; you can still send to up to 1,000 subscribers on the free plan.
- Organize your account by creating your desired Lists and Groups.
- Set up your Automations, Welcome Emails, and Onboarding Sequences.
- Switch your Sign-Up Forms, Plugins, and Widgets (and update any links in your materials, if needed).
- Start sending email campaigns from MailerLite
- Close your Mailchimp account once all sign-up forms are switched and data is exported, or downgrade to a free account temporarily until you are sure everything transfered
A Step-by-Step Guide to Migrating Your List from Mailchimp to MailerLite
We found that switching from Mailchimp to MailerLite was surprisingly smooth, thanks to MailerLite’s user-friendly integration features.
Now that we’ve highlighted the benefits and your tasks, it’s time to guide you through the migration process. Whether you prefer an automated import or a manual transfer, this quick-start guide will walk you through both methods for moving your subscriber list over to MailerLite.
The first step? Setting up your MailerLite account. You can follow along with our video, which takes you through the initial signup process.

Automated Import from Mailchimp to MailerLite
If you'd like to automatically transfer your subscriber lists from Mailchimp to MailerLite, follow these steps once your MailerLite account is approved.
Go to the Subscribers Page: After logging into your MailerLite account, find the “Subscribers” section in the main menu.
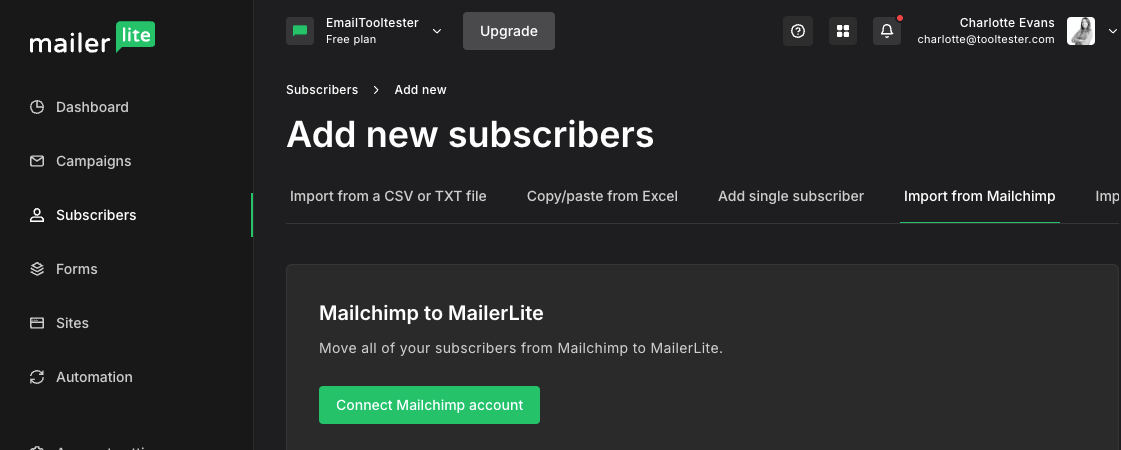
- Add Subscribers: Click on the “Add Subscribers” button to begin the import process.
- Import from Mailchimp: You’ll find the tab in this import section.
- Connect with Mailchimp: Select the “Import from Mailchimp” tab and click the “Connect” button. This will prompt you to log in to your Mailchimp account to establish the connection.
- Select Lists to Import: Once connected, choose which Mailchimp lists you'd like to import to MailerLite.
- Map Fields: Before importing, match the subscriber fields from Mailchimp with the corresponding fields in MailerLite. If MailerLite doesn't have a field that matches one from Mailchimp, you can create a new field on the spot.
- Assign Groups: Choose the MailerLite group(s) to which you'd like to import your subscribers. In MailerLite, groups serve a similar function as tags do in Mailchimp. Note: If the selected group is used as a trigger for automation, you'll have the option to include or exclude the newly imported subscribers from that automation.
Then, once you’ve completed these steps, your Mailchimp subscribers should be successfully imported into MailerLite.
Manual Export from Mailchimp to MailerLite
The manual method is ideal if you prefer a hands-on approach or need more control over how your data is transferred. To manually export your subscriber data from Mailchimp and import it into MailerLite, follow these steps:
1. Export from Mailchimp:
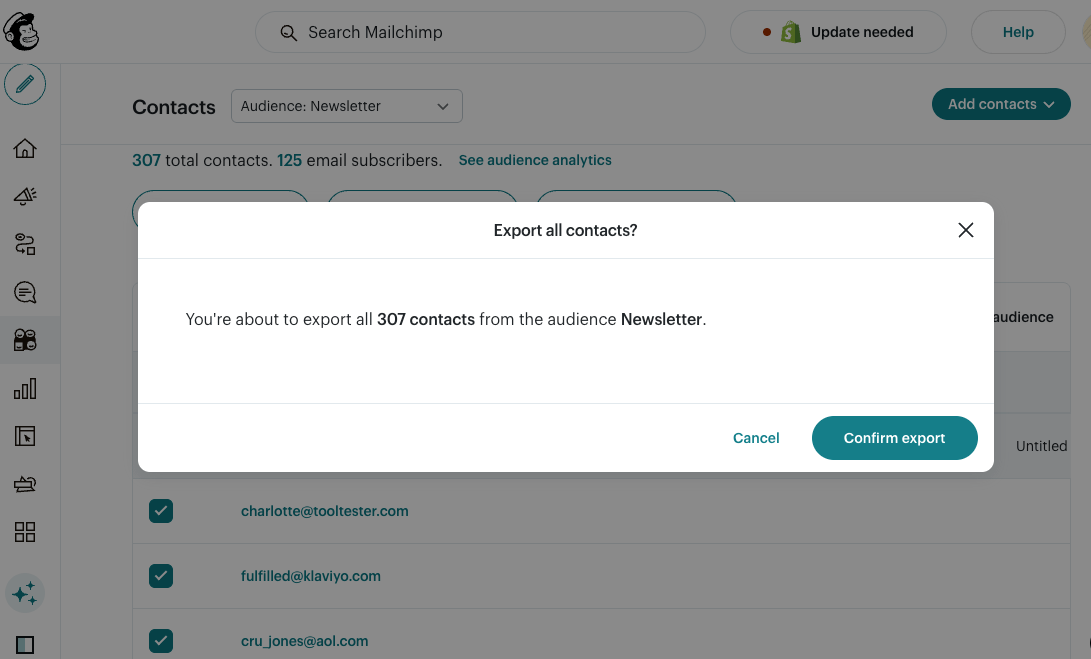
2. Open Mailchimp and click on the “Audience” icon.
-
- Select “All Contacts.”
- If you have multiple audiences, use the “Current Audience” drop-down menu to choose the one you want to export.
- Click “Export Audience.”
3. Once the export is ready, click “Export as CSV” to download the subscriber data to your computer.
4. Import into MailerLite:
-
-
- In MailerLite, head to the “Subscribers” section.
- Click the “Add Subscribers” button and choose “Import from a File.”
- Upload the CSV file you exported from Mailchimp.
- As with the automated import process, map the fields and assign the appropriate groups in MailerLite.
-
Wrapping Up: Making the Switch to MailerLite
Switching from Mailchimp to MailerLite might feel like a big step, but with the right guidance, it’s easier than you think. Thanks to MailerLite’s lower pricing, intuitive interface, and more flexible approach to list management, it’s a smart choice for small businesses seeking a simpler, more cost-effective Mailchimp alternative.
Whether you opt for MailerLite’s automated import feature or prefer to migrate your data manually, the step-by-step instructions in this guide will make the process a breeze. Once your lists and workflows are set up, you’ll be ready to launch your first campaign – and make the most of everything MailerLite has to offer.
Good luck with your MailerLite journey!
> Sign up to Mailerlite for free
The authors
Learn more about us

Our Methodology
This article has been written and researched following our EmailTooltester methodology.
Our Methodology